Wednesday, April 29, 2009

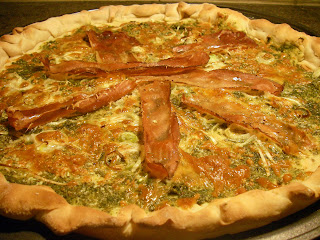
Instant Gratification Pizza with Pesto, Local Spring Onions, and Speck

I'm still on the food processor kick, so I decided to try an instant pizza dough recipe from that How-To DVD I spent an hour watching. (Go ahead, laugh it up.) The DVD really was informative because it was mostly recipe demonstrations and Hubert Keller was the star. Not only is he a well-respected chef, but he also has a fun accent which makes an hour of recipe TV even more enjoyable. He made a pizza dough in the FP that he literally took straight out of the bowl, rolled out, topped, and baked. No rising whatsoever. So, since it was already like 6:30 and we had an open bottle of wine, I decided that this was the time for instant gratification. Here's the recipe:

-1 package active dry yeast
-1 tsp sugar
-2/3 cup warm water
-1 2/3 cups AP flour
-1 tsp salt
-2 tsp oil (or just "some," as I did it)
-dusting of cornmeal for pan

Stir yeast and sugar into warm water and let stand until foamy, about 10 minutes. (Note: mine didn't really foam. I think my yeast might be dead. If yours foams, you may have a less crispy crust.) Put flour and salt into food processor bowl and turn on. Add yeast mixture to bowl and process until dough pulls away from sides. Add oil and process just until dough forms a ball. Roll out dough on floured surface, dust cornmeal on bottom and press to stick, then transfer to a 14" pizza pan. Tha's it!

Of course, the perfect pizza really starts with the perfect dough, which tends to be achieved through a much more committed, slow process called retarding. According to Ken, of the highly acclaimed Ken's Artisan Pizza, retarding is the key to a complex and orgasmic product. Take a glimpse of his genius in the informative essays found here. And if you haven't yet been to Ken's, yes, it is worth the wait and yes, it is that good. The hot Calabrian chiles are like spicy crack.

So, Ken likes it long and slow. While I can't disagree, I didn't have the patience for such things tonight, hence the quickie with Hubert. I certainly didn't expect a pizzagasm over this, but for what it was, it was good. If you're into thin and crispy crust, you'll love this. The flavor is actually quite good and for a light, crisp 'za in a hurry, you really can't beat this technique. I busted it out in, like, 5 minutes. No joke.

I topped it with basil-almond pesto (see recipe below), local spring onions, a combination of mozzarella and Vella Dry Jack cheeses, and speck. It baked for about 15-18 minutes at about 425 F. Keep an eye on it and turn it if necessary to ensure an even browning of the crust and toppings. I finished it with some good olive oil and sea salt. Enjoy this baby with Ray LaMontagne's latest, Gossip in the Grain because if you're having a pizza quickie, you're probably feeling mellow, but maybe longing for the slightest bit of romance.


Basil-Almond Pesto:

Add this to FP bowl:
-large handful of fresh basil leaves
-1 large (or 2 small) garlic cloves
-small handful of raw almonds*
-good pinch of salt

Turn processor on and stream in olive oil until you get the consistency of a spreadable paste. Add about 1/4 cup of freshly grated Parmigiano, mix in and season with more salt if necessary (to taste).

*Raw almonds are in the "superfood" hall of fame for their long list of health benefits. The raw almond has been credited with everything from cancer prevention to weight loss to improved complexion. Traditional basil pestos are made with pignolis, but I use raw almonds because the result is just as good, but packed with more healthy bonus points.

Tuesday, April 28, 2009

My Veggie Burger, the Hero

Behold...
...the coveted and ethereal 11-cup Pro Custom Cuisinart Food Processor! This sacred machine finally graces my kitchen, after a lifetime of sacrifice, devotion, and meticulous dicing. The Chopper, the Shredder, and the Dough Mixer in one. Terra pax and so forth. Amen.

Right, so I got a new food processor. Yeah!!! I'm finally a real cook! My last one was a cheap mess, but it did die an honorable death in battle. (Jesse and I had it pinned down from either side, both trying to force the lid off after it's last bout with biscuit dough. The dough survived, but the bowl cracked all Liberty Bell-style.) I scored this new FP for a ridiculous deal and have been prancing around it proudly for days now.
My favorite accessory is the How-To DVD. Yes, I watched it. No, I'm not always that big of a loser.

OK, enough babbling and gawking...what am I gonna make with this thing? Something that requires a hell of a lot of fine chopping is the key so I can a) save time and b) try out every attachment and scoff at my lowly knives in the corner. The answer: veggie burgers!

If you just lost interest, I urge you to keep reading. The veggie burger has gotten one of the worst bum raps in gastronomy. I think this mostly comes from people who eat veggie burgers because they really want a hamburger and they're trying to sneakily disguise it. That usually doesn't work out because, well, it is difficult to replace a cow with a carrot, know what I mean? But, if you treat the veggie burger as its own entity -- just a delicious (and nutritious) sandwich -- it's really quite good. Here is my version:

The key is flavor. This may sound obvious, but vegetarian fare has also gotten all wrapped up in the bad zone due to its common lack of flavor. I seriously urge you to try this bundle of joy and tell me it has any relation to cardboard. Try it!

La Receta:
Using your new 11-cup Pro Custom Cuisinart Food Processor (herein after, "the FP"), chop:

-one medium sweet onion
-one large clove of garlic
-one red bell pepper (seeds and ribs removed)
-0ne serrano chile (seeds and ribs removed unless you like it HOT)
-a heaping handful of crimini mushrooms

Smile adoringly at how easy that was. Saute in a large skillet with olive oil. Now, using the shred attachment of the FP, shred:

-one medium carrot
-one medium parsnip

Smile again. Add to saute pan. Now switch to the slice attachment of the FP, and finely slice:

-one smallish bunch of Italian kale*

Add to saute pan. Laugh at how long that would have taken you without the FP. (If you are using a knife for this...I'm sorry for you.)

The mixture in the pan should start to come together sort of like, well, ground beef! To that, add about a tbsp of chili powder, a tsp each of cumin, salt, and cocoa powder, some turns of fresh black pepper, and a handful of dried cherries. (I actually used dried cranberries this time because that's what I had on hand. Still good.) Last, add about 3/4 can of black beans and mash some of them. Incorporate the whole mixture and taste it. If it's good enough to eat alone, it's done. If not, season to your tastes. Form into burger-like shapes and lightly sear each side in olive oil. I topped these with some incredible aged Manchego (thanks, Scott!), sliced semi-firm avocado, crunchy frisée, and some Jufran's Hot Banana Sauce. This sandwich has a decidedly Latino flare, which makes it even more heroic in my book. The addition of cocoa powder was inspired by Oaxacan mole, Manchego is a Spanish cheese, and avocados are very common in Cuban cuisine. Oh, and the banana sauce is Philippino, but it feels like the same family. My intention was to make sweet potato fries or tostones with this, but it was getting pretty late so we had chocolate chip cookies from the dough in the fridge instead.

Enjoy this health and flavor powerhouse with your old Jimmy Cliff mix. Not only will you be the hero of your veggie-averse friends, but you'll be helping them see clearly now, and for years to come. If Cool Runnings is on TV...bonus.

*Various studies have been done on eye health and diet. Kale is apparently the best thing you can eat to maintain healthy vision. Jesse has eye issues, so we eat kale regularly and it is surprisingly versatile and delicious. This sandwich is also packed with other antioxidant-rich ingredients, like carrots, avocado, and garlic, that contribute to strong eye cells and tissues.


Sunday, April 26, 2009

Rick's French Toast with Strawberries

I'm about to share with you a little French toast* secret that I learned from the owner/head chef of the Alameda, the restaurant in Louisville, KY where I used to work. The secret to amazing French toast is...cheese. That's right. We always served Asiago cheese bread at the Alameda, but some days when it was really slow or we were opening early for lunch, Rick would slice up thick chunks of the cheese bread and turn them into the best French toast I've ever eaten. Sounds strange, but if you haven't tried cheese bread French toast, I'm telling you, you haven't lived.

We had some Asiago kaiser rolls left over from the pulled pork extravaganza, and since it was a lazy Sunday morning, I decided to bring Rick's French Toast to Portland. It's a pretty classic recipe: just mix up eggs, milk, vanilla, cinnamon, and sugar, then dip the bread in there and fry it up. I simply topped it with some fresh, lightly mascerated strawberries and a dusting of powdered sugar. The slight saltiness from the cheese brings out the sweetness of the egg coating and the berries. Serve with coffee and public radio jazz. (Or a screwdriver and public radio bluegrass, if you're feeling feisty.)


*Make any mention of "Freedom Toast" and I'll slap you in the face with it.

Pastafacarol

This dish was inspired by three things:

1. A recipe I saw on Food TV while salivating on the stair climber.
2. A new mandoline that I recently received as a gift.
3. My dear friend Carol, who likes to create her own pasta dishes at restaurants.

I had picked up a zucchini and some Meyer lemons on my latest adventure at the Food Front Co-Op, and I saw this recipe on TV that would allow me to use the zucchini and my new mandoline. Yes! Multitasking is so productive. So, first thing's first: figure out the mandoline. If you have one and have lost your instructions, too, here is a nice link for you. I'm sure you think you can do it on your own, and maybe you can, but I strongly advise removing the chip from your shoulder just for now so as not to julienne or waffle-cut your phalanges.

Thanks to this website, I was able to go from this:
To this:

Fingers intact and all. Anyway, the whole point of the julienned zucchini is to have it mimic spaghetti in the dish, therefore requiring you to use less pasta. It's a "healthy meal," see? But, of course, the eternal supply of rogue boxes of spaghetti in the various pantries of my life had somehow finally been depleted, just when I needed them most. Great. There was also a nice basil oil from the recipe on TV that was supposed to finish the dish, but when I opened the fresh-from-TJ's box of organic basil, it was all moldy and nasty. WTF? Things are not going well.

So, here's what happened:

Boil water for pasta. If you have somehow fallen into the 2% of Americans without spaghetti in the pantry like me, use whatever you have. I settled for organic penne rigate. (A note about boiling pasta. Really salt that water good. My friend and chef mentor once told me it should be "like the sea." This is your one chance to flavor the pasta itself, so don't be skimpy.)

Mince about 3 large cloves of garlic and saute in 1/4 cup extra virgin olive oil until light brown. Toss in a tsp or so of crushed red pepper flakes. Chop up a few tbsp each of fresh basil (preferably the unmoldy kind) and flat leaf Italian parsley, then toss in the pan and remove from heat immediately. When pasta is al dente ("to the tooth," in Italian), drain and throw it in with the garlic and herbs, along with a few tbsp of its cooking water. Toss with zucchini, the juice of half a Meyer lemon, and freshly grated Parmigiano-Reggiano cheese. Season to taste with S&P. Top with lots of grated Parm and some fresh Meyer lemon zest.


This actually turned out really well, despite the slight mishaps along the way. If you're in the mood for a healthier pasta with some veggies to boot, give this a try. It's a great "light and fresh" pasta dish, free from the shackles of bolognese or alfredo, just like Carol likes it. I'd like to think that if this was on the menu in an Italian restaurant, she just might order it. Maybe...

Pair this with some Al Green and maybe just one more glass of wine. Mucho fun!

And now I'd like to take a moment to thank a few special people, without whom this dish wouldn't be possible: First, Grandaddy and Dani for the wonderful mandoline. I can't wait to make waffle fries! Second, Michael Chiarello, for being on TV while I was hungry at the gym. And last, but not least, Carol, for never settling for just what's on the menu.

Hangover Miang Khum

Question: What do you do when you're hungover and have a fridge full of left over pulled pork?
Answer: Turn it into Thai food!


Thai food is my ultimate hangover food. Something about the balance of all five taste sensations paired with the capsaicin high and fry oil create this magical cure-all that I just can't resist. After a big night out, I literally wake up craving Pad Kee Mao.

We had a good amount of left over pulled pork, but after all the festivities and vodka drinks, the thought of another pork sandwich made my stomach turn. Also, we were out of BBQ sauce. So, out came the Asian market bounty: soy, palm sugar, chili-garlic sauce, galangal (Thai ginger), Sriracha, fish sauce, and a handful of limes. I somehow managed to get all of that into a sauce pot and simmered it just a bit to dissolve the palm sugar, then poured it over the pork and let it marinate for a while. I figured something good would come of that.

After a slow, muddled thought process and some glazed over stares into the cupboards, I finally decided on a sort of Miang Khum-ish dish. Miang Khum is a traditional Thai street snack that usually involves shredded coconut, diced limes, ginger, roasted peanuts, dried shrimp, shallots, and diced chiles. All of this stuff gets sprinkled into a spinach leaf and wrapped up with a sweet brown sauce. It's sort of like a Thai taco bar. My friend Scott, the Thai aficionado, described it as little bites of flavor explosions...or something like that. My version was supposed to be a main dish, so the addition of pork made it significantly more substantial. It went something like this:

Dice up little piles of the following:

-roasted peanuts
-limes (skins and all)
-fresh mango
-chile peppers
-cilantro

Set aside. Take a head of cabbage and remove leaves, keeping them whole so they can hold the flavor explosions you're about to fill them with.


Make a dipping sauce. Mine was the same ingredients as the marinade. I think ideally it should be sweet, salty, tangy, and spicy. (i.e. palm sugar, fish sauce, soy, lime juice, chili-garlic sauce, ginger) Simmer until sugar is dissolved and you get a nice saucy consistency. Pour into a bowl and set aside.

Dice shallots and yellow bell peppers and saute until soft. Chop up marinated pork and add to saute pan. The slight char on the bits of pork add both flavor and texture.

Now the fun begins. Grab a cabbage leaf and fill it with all the stuff you just prepared. The amount of flavor that you get out of one bite is really astounding. You get saltiness from the peanuts and pork, sweetness from the mango, tanginess from the limes, spice from the chiles, brightness from the cilantro, and just enough fattiness from the pork to coat the unsettled stomach. And on top of all that, it's actually pretty healthy. Score!

So, there you have it: the perfect hangover food. Enjoy with some nice, quiet Thelonious Monk and a big glass of water.


Note: Adjust the amount of spice depending on how hungover you are and how much heat you can tolerate. Ideally, the more the better, in my opinion. Capsaicin, the spice-producing compound found in chile peppers, has many health benefits, including properties for hangover relief. Check it:

"It is common for people to experience pleasurable and even euphoriant effects from eating capsaicin-flavored foods. Folklore among self-described "pepperheads" attributes this to pain-stimulated release of endorphins."

See, no pain, no gain.

Friday, April 24, 2009

Pulled Pork with a Side of Whoop Ass

Did you know that pork butt is not really from the hind region of the pig? It's actually the shoulder. I hope that brings some happiness to your life.


We were on our third 80 degree day in a row, Game 2 of the playoffs was on that evening, and it was Earth Day Eve. Basically, it was a Tuesday just begging for a party, and I got the urge to make pulled pork sandwiches. I've never done this before either. (I know, first the biscuits, now this.) So, instead of trying it once just in case it was a dry mess, I decided to invite a bunch of people over for the game. Nice. I was nervous all f-ing day.

I picked up a nice 5.5 lb boneless pork butt from Gartner's Meat Market, which I highly recommend for all of your Portland area meat needs. My dry rub was something like this:

1 1/2 - 2 tbsp paprika
1 tbsp garlic powder
1/2 tbsp ground ginger
1 tsp ground coriander
1 tsp cayenne pepper
1 tbsp dry mustard
1/2 cup brown sugar
2 tbsp kosher salt

I cut some slits into the meat and then I really rubbed it to let the flavors permeate.

I only let it marinate for 2 hours because I wanted to make sure it was done by half-time, or at least in time to call for Thai takeout (in the event of a disaster), but I would have liked to let it go for longer. People say that overnight is best. I baked it in a 275-300ish degree oven, covered, on a roasting pan for about 4 hours. I was expecting it to take at least 5 or 6 hours, but the internal temperature had surpassed 190 F after 4 hours, which is plenty of cooking. Any longer and I think it would have been dry. I was really anxious to assess my success or failure and start pulling it right away, but it must rest for a while. If you cut it right away, all the juices will run out and you'll loose all that good moisture and flavor.

In the mean time, make a barbeque sauce. Mine is a mess of things that I can't begin to address in true recipe form, but I'll just say that it starts with sweet onions that get softened in bourbon. Then there is ketchup, cider vinegar, soy sauce, cumin, paprika, garlic powder, brown sugar, fresh ginger, Worcestershire sauce, Sriracha...yeah, I think that might be it. I'm not telling my secret ingredient. From there I just let it simmer away until it reduced to sticky saucy goodness.

Things were looking good. The Blazers were heading into Game 2 with a new vengeance after the ass-kicking they got last weekend, cornhole was in session in the driveway, and yes, the pork pulled appropriately. Thank God. I didn't get to any of the sides I had in mind, but I did manage to throw together a salad and open some jars of pickled okra and Wickles. I was a few drinks deep by the time the plates were piling, so I only got a couple mediocre photos, but you can at least kind of get the idea.

Overall, I'd say it was a success, but here are my exact notes that I took at the time of consumption:

"Pretty good, marinate longer, more salt."

My friends seemed pretty happy about the whole thing, but that could have just been because Rip City decided to show up that night. Well, and because of the Wickles.

Buttermilk Biscuits to Save My Reputation


I'm embarrassed to say that this was my first attempt at homemade buttermilk biscuits. I come from a long line of feisty Southern belles, so actually this is more than embarrassment. It's like...sacrilege. Even worse is that the only reason I made them was because of a carton of buttermilk in the fridge that was about to turn. Or at least, about to expire. Buttermilk is kind of already "turned," isn't it? I'm a little confused by this.

Anyway, I did some research, made some modifications, and decided on this recipe:

2 cups self-rising flour

1/2 tsp baking soda

a good pinch of salt

6 tbsp cold butter, cut into small cubes

3/4 cup buttermilk


I discovered some great advice in my research that suggested doing this in the food processor. Pulse dry ingredients in the FP, then add butter and pulse again until the mixture looks like the topping for an apple crisp. Note: make sure the butter is cold when you do this. Little bits of butter in the dough equal unsucky biscuits. Next, pour in the buttermilk and pulse
just until it becomes dough. (This will happen very quickly, and impressively easily. God bless the FP.) Once this happens, turn the dough out onto a floured surface and press out to about 1/2" thickness. Fold it over on top of itself like twice, but don't mess with it too much. Cut it into 12 pieces with a pastry cutter, or if you aren't that cool, just use a pizza cutter like me. The idea is to handle the dough as little as possible.

Since I'm trying to regain some respect from my Southern ancestors, I baked these in a cast iron skillet. I don't really see why you would do it in anything else, actually. Just like I don't see why you would drink out of a regular glass when you have the option of drinking out of a mason jar or a copper mug. But I digress.

We had to taste one to make sure it was biscuits. It was.

Jesse also loves things in cast iron skillets. Yes, he is always that happy.

We ate them straight up with butter and honey and jam, but I'm looking forward to making them into a slutty breakfast sandwich one morning after a hootenanny, as my friend Brandon would say. Get some Grisman/Garcia on the speakers when you're eating these.

Thursday, April 23, 2009

Wild Mushroom Agnolotti with Asparagus, Sweet Spring Onions, and Speck


"You got a box in the mail that says, 'Keep Refrigerated.' Should I open it?"

This is the message I got from my roommate the other day. I had completely forgotten about the Tastemaker Program, where I am supposed to review new products they send me, so of course I had a lot of fun thinking about what the hell was in the "Keep Refrigerated" box. It was a huge receptacle, mind you. Like, big enough to contain a reasonably sized living creature. Imagine my disappointment when it was just pasta.

It turned out to be a new product from Buitoni called Buitoni Riserva, which apparently contains 100% natural ingredients. Right. I have an issue with products that advertise this, like fast food shacks and their new chicken sandwiches, "now with 100% natural chicken." Uh, so what was in the other stuff?


Anyway, the specific product was Wild Mushroom Agnolotti, and I'll tell you what, those little bastards were actually really tasty. The filling was shockingly ample, flavorful, and identifiable. I even plucked a large piece of mushroom out of one of them. This is both impressive and surprising to me. Nice job, Buitoni. Must be all the natural ingredients in there...

My preparation goal was to showcase the pasta, so rather than drown it in sauce, I decided to pair it with some complimentary fresh springy flavors. I picked up some nice looking sweet spring onions and a bunch of asparagus at the farmers market and stopped at Pastaworks (another fab local market with a killer meat case) for some speck.

Speck is another product from the pig, or as I like to call it, the culinary wonder animal. It comes from Tyrol, which is an Italian region near the Austrian border (hence the German-sounding name). Think prosciutto, only smoked and laced with a hint of juniper berry. I learned about speck from watching the great classic Italian chef, Lydia Bastianich. I like to say it like her: "schpeck!"

First, I sliced up some of the speck and
sautéed it until almost crispy. Next, I grilled the asparagus and onions to give them extra flavor, then chopped them up and sauteed them in the pan with the speck drippings. The agnolotti only took about 3 minutes to cook (they were fresh...did I mention that?), so I boiled them at the end and then just before serving, I added them to the pan with a splash of their cooking water. They were thick and reminded me of pierogies, so I felt like giving them a little char rather then serving them all slimy and chewy-like. I tossed the saute with the speck, some good olive oil, and chopped fresh rosemary right before serving. Topped with shaved Parmigiano and served with a simple green salad with lemon vinaigrette.


The salty, smokiness of the speck worked well with the creamy, earthiness of the 'shroom filling, and the grilled veg added an appropriate texture contrast, along with some freshness and a hint of grill char. Success.

Oh, I also grabbed a rosemary focaccia at the market. Ripping off chewy, fragrant hunks of that to sop up any lemon vinaigrette or rogue bits of speck was quite satisfying. Preferably serve this outside on a brilliantly sunny day with some classic Italian trattoria-style music and say, "tutti a tavola a mangiare!" The vitamin D and Italian eating commands really add to the experience.

Wednesday, April 15, 2009

Sour Cream Coffee Cake

What? I had 3/4 of a tub of Tillamook sour cream left in the fridge and I live with a lactose-averse "healthy eater" (i.e. the arch nemesis of sour cream.) Have to disguise it, but can't let it go to waste.... We're in a recession, haven't you heard?!?

Note: This recipe was adapted, or rather, basically hijacked from Ina Garten.
Check out the real deal here.


Sour Cream Coffee Cake with Berry Streusel
-1 1/2 sticks unsalted butter
-1 1/2 cups granulated sugar
-3 large eggs
-1 1/2 teaspoons pure vanilla extract
-1 1/4 cups sour cream
-2 1/2 cups AP flour
-2 teaspoons baking powder
-1/2 teaspoon baking soda
-1/2 teaspoon kosher salt

Preheat oven to 350 F. Cream butter and sugar until its fluffy, try not to eat it just like that, then add sour cream, eggs, and vanilla. Combine (or sift, if you can) dry ingredients in a separate bowl and add slowly to wet mixture. Don't over mix. Spread about 1/2 the mixture into a greased loaf or tube pan.

Berry Streusel
-1/2 cup AP flour
-1/4 cup brown sugar
-1 tsp ground cinnamon
-1/4 tsp salt
-3 tbsp cold unsalted butter, cut into cubes
-1/2 pints each, raspberries and blackberries (or whatever you like)

Combine everything but the berries in a bowl and pinch with your fingers until it forms a crumble. Butter must be cold for this or it will just melt and clump together.

Sprinkle 2/3 of the streusel over the batter in the pan, then dot with berries (all of them), spreading evenly. Spread remaining batter over that and top with the rest of the streusel. By the way, this recipe is for a tube pan, so it will be a bit much for a loaf pan. It also rises a lot, so be careful not to overfill the pan. Not a bad idea to bake on top of a sheet pan in the oven, in case of messy overflow. Bake for 50-60 min in tube pan, or more like 70 in a loaf pan. Test with cake tester (i.e. bamboo skewer!) to be sure.

When the "cake tester" comes out clean, fight the urge to dive in immediately and let cool for about 30 minutes. In the meantime, mix up a glaze of your choice. Confectioners' sugar, vanilla, and water make a nice simple glaze, but you can also add maple syrup for extra flava, as Ina suggests. You want the consistency to be thick but drizzle-able. When cake is cooled, remove from pan and drizzle with glaze.

This is almost even better the second day, so resist the urge to eat the whole thing in one sitting. Eat your heart out, Jim and Patty's!

(I'm just kidding, I love you J & P's. Seriously, though, this coffee cake is damn good.)

Sunday, April 5, 2009

Happy Hour Cupcakes

They say that cooking is an art, but baking is a science. Well, this is certainly true and while I think I can throw together a nice dinner pretty well with my limited education in food, baking is certainly a different story. My latest culinary marathon was truly a grueling one because of this whole food science business. I was asked to make some cookies to help my favorite carpet slinger woo designers all over Portland into buying his product, so of course instead of just saying yes, I decided I had better make it a whole lot more involved. After much consideration, along with the knowledge that people in PDX have a thing for little tiny cupcakes (i.e. Cupcake Jones and Saint Cupcake), that's exactly where I ended up: in the capital of Mini Cupcake Country.

The bounty was to be distributed on a Friday, most likely in the afternoon, and what is everyone in an office thinking on a Friday afternoon? That's right, happy hour. Especially in Portland, where we are so happy we have happy hour twice a day. Seriously, we do. And now I give you, Happy Hour Cupcakes!

Ingredient Army

I decided on four flavors, (which I would later come to regret, as this required a hell of a lot of work), all based on some of my favorite cocktails. There would be two vanilla based cupcake flavors, and two chocolate. So here they are:

Meyer Lemon Drop

Bourbon & Ginger


Spanish Coffee

Rubinator

Meyer Lemon Drop: I chose this because the lemon drop is a pretty popular, easily recognizable drink, and I really wanted to incorporated a sugared rim into one of the cupcakes. For the cake I figured I had better get back to basics and choose a truly classic vanilla cupcake, so for that I had to use the recipe from Magnolia Bakery in NYC, which basically put the cupcake on the map. (Or at least on Page Six.) You can find that recipe here. To make it a little lemony, I just added a bit of lemon juice in place of some of the milk, and some fresh lemon zest. Warning, do not over bake these guys. I did it and I'm now kicking myself. If you are making mini cupcakes like I did, the bake time is less than what is listed in the recipe. After they cooled, I rolled the edges in a little water and then in a mixture of organic evaporated cane sugar and Meyer lemon zest. (Just like the sugared rim on a lemon drop glass! Get it?!) The frosting was a classic buttercream, but I added a good bit a fresh Meyer lemon juice, which really kicked the flavor into lemon land. Yum! These were actually my favorite of the bunch.

Bourbon & Ginger: I had to do this because bourbon and ginger is my favorite drink of all time. (Remember the Kentucky thing? And the ginger thing? There it is.) I will make these again because they weren't quite spot on, but they still tasted like a good cupcake...just not B&G enough. I used the same vanilla cupcake recipe, but instead of lemon juice I added 1/4 cup of Reed's Extra Ginger Brew (the best, in my opinion) and 1/4 of good Kentucky bourbon.* I also added about a tsp of grated fresh ginger, and about a tsp of ground ginger. While they were baking, I reduced some bourbon and ginger ale on the stove. After the cupcakes came out, I poked them with toothpicks and drizzled a bit of the reduced B&G over them, to keep them moist and bourbony good. They were topped with a basic cream cheese frosting, kicked up with about a tbs of bourbon. Oh, and of course I used pure bourbon vanilla in the cakes and the frosting. I topped them with chopped up all natural ginger candy, also from Reed's. (You can find Reed's at any nice grocery store, and even some not-so-nice ones. I got mine at New Seasons, but unfortunately for those of you outside of Portland, you don't get to experience this blissful store. Sorry.)

Spanish Coffee: This was a must because Portland freakin' loves Spanish Coffee. I can't say for sure because life before Portland is sort of becoming a blur to me, but I don't think I had ever even heard of Spanish Coffee before I moved here. Maybe it's because of all the great coffee in Portland, or maybe it's just because the dark, rainy days of winter are really not good for anything other than sitting inside with a nice flaming cup of alcoholic coffee. Either way, they're quite the thing around here. Though almost every bar has it's own Spanish Coffee method, the place that made it famous is Huber's, the oldest restaurant in the city, which specializes in delectable Spanish Coffee and turkey. Yeah, weird, right? Anyway, I used their recipe as my inspiration for the cupcake. The chocolate cake recipe actually came from Ina Garten, which you can see here. The addition of some extra coffee grounds really gave the cakes a nice coffee flavor, without being overpowering. Another warning: the batter is extremely runny and you will probably think you did something wrong, but they bake up nicely. Just don't overfill the pan. They were topped with a cinnamon buttercream and dusted with cinnamon and freshly grated nutmeg, just like they do at Huber's. (They also serve the coffee on fire at Huber's, but that didn't really go over so well with the cupcakes.)

Rubinator: This is another local favorite from McMenamins, which is probably the most unique pub/theater/hotel chain on earth. Among the hundreds of things the McMenamins properties do, they brew their own beers, which include the Terminator Stout and the Ruby Ale. It's not on the menu, but if you ask for a "Rubinator," you'll get a blend of the Terminator and the Ruby. It's kind of like a black and tan, but the Ruby Ale has a hint of raspberry to it, so it's more exotic. So, this cupcake was a chocolate stout cake recipe that I sort of fudged (no pun intended) from a few different sources. One that I kind of used is here. The raspberry part was the raspberry cream cheese frosting, which was a basic cream cheese frosting recipe combined with mascerated raspberries pressed through a strainer to get rid of the seeds. I was very pleased with this frosting, as it turned a beautiful pink color without any food coloring whatsoever. And the fresh raspberry taste was really perfect. I topped these with a bit of shaved organic dark chocolate. These seemed to be the favorite of the bunch, which I honestly think has to do with the visual aspect; they just looked so pretty! (They did taste quite good, too...)

So, while I'm not a baker, I'd say with the help of some really good recipes and a little creativity (and an affinity for things that celebrate drinking), the Happy Hour Cupcakes were a great success. I even got a catering request out of the deal! And hopefully, lots and lots of carpet will be sold. The moral of this entry is, if you want to get someone to do something, make them cute little cupcakes. And if you really want things to work in your favor, make the cupcakes somehow related to drinking. Yeah!

Cupcake Army

*A note about bourbon, since I am from Kentucky. Bourbon is only bourbon if it's from Kentucky. All bourbons are whiskeys, but not all whiskeys are bourbons. Just like champagne is only sparkling wine unless it comes from the Champagne region of France. Don't let anyone try to tell you that Jack Daniels is bourbon. It's not.